Choosing Furring Channels in 2026 is not just a profile-selection exercise. These narrow metal sections help create a level fixing surface for board, conceal services, and support ceiling or wall assemblies. Yet the right choice depends on the project: substrate, fixing method, spacing, expected loads, moisture exposure, and required finish all matter. Small parts, real consequences.
The stakes are broader than appearance. UNEP and the Global Alliance for Buildings and Construction reported that buildings accounted for about 32% of global energy demand and 34% of energy-related CO₂ emissions in 2023, in their 2024 Global Status Report for Buildings and Construction. Those figures do not measure furring-channel performance. They do show why durable, well-detailed building assemblies deserve attention. A channel that suits the board and support conditions can help avoid rework; one chosen by price alone may not. That distinction is easy to miss.
This guide explains how to compare channel profiles, material thickness, protective coatings, and manufacturer load and span data. It also highlights compatibility with the selected lining system and relevant project specifications. For example, check the channel’s published dimensions and installation details against the board manufacturer’s requirements, rather than assuming similar-looking products are interchangeable. Product data varies, and site conditions rarely match a neat drawing perfectly. A little doubt is useful. Verify the details before ordering, and treat 2026 as a reason to review current documentation—not as proof that every product has changed.
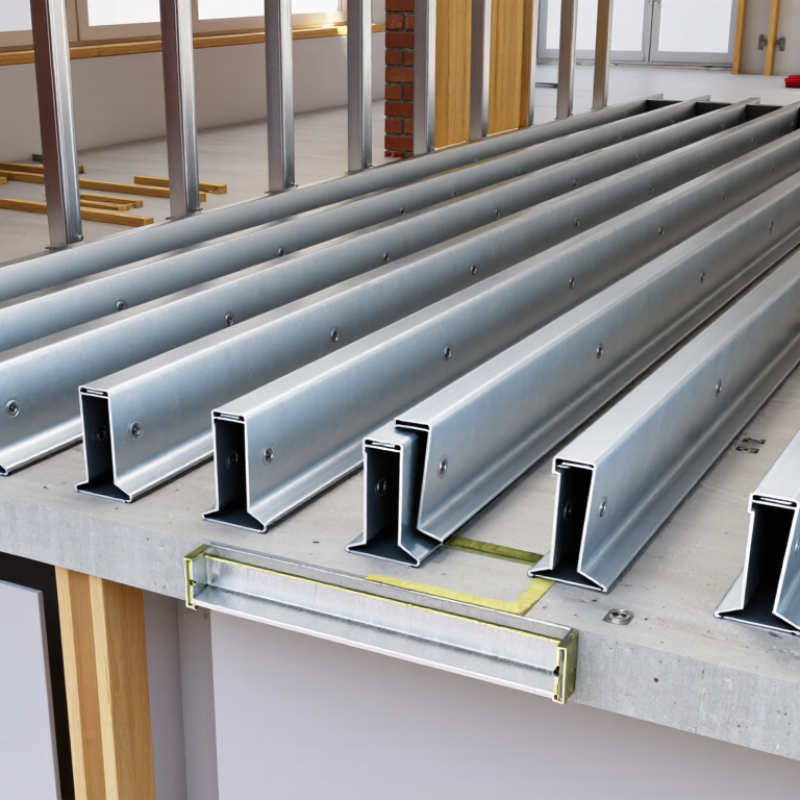
Furring channels create a straight surface for attaching wallboard or ceiling panels. Hat channels are common on walls and ceilings, while resilient channels help reduce sound transfer when installed as part of a tested assembly. Heavier carrying channels can support suspended ceiling systems. The right type depends on the structure, finish, and expected load. Small details matter.
For a project, check channel depth, metal thickness, spacing, and fastening requirements against the system specifications. Uneven masonry may need deeper channels to leave room for services or insulation. In a sound-rated wall, even a misplaced screw can bridge the resilient channel and reduce performance. That can be frustrating. Do not assume every channel can carry cabinets, lights, or other heavy fixtures; those may need separate blocking or support.
Furring channels are used over concrete, masonry, timber, and steel framing, as well as in suspended ceilings. In damp areas, confirm that the channel’s protective coating suits the exposure and that compatible fasteners are specified. Conditions vary. A detail that works in a dry bedroom may fail in a humid basement. Review load tables and installation instructions for the complete assembly, not just the channel dimensions.
How to Choose Furring Channels in 2026?
Assessing Project Loads and Existing Substrate Conditions
Choosing furring channels starts with the loads they must support and the surface they attach to. A ceiling carrying insulation, services, and board needs a different assessment from a lightly lined wall. Check the full system specification, including channel spacing, span limits, fasteners, and the finish weight. Small changes matter. A heavier lining or longer span can increase deflection and lead to visible sagging or cracked joints. Never assume that a channel suitable for one room will suit another.
Inspect the substrate before selecting a fixing method. Look for loose plaster, cracked masonry, corroded framing, moisture marks, and uneven surfaces. Use a straightedge to find high and low spots, and check whether timber or metal supports are sound where fixings will land. A neat surface can hide weak backing. If the substrate is damaged, get it assessed rather than expecting the channels to correct it. Record measurements and site conditions; they are easy to overlook once installation begins. I have seen plans rely on assumed joist positions, and that assumption can be wrong. Where loads or substrate capacity are uncertain, consult a qualified building professional and follow the system manufacturer’s tested guidance.
In 2026, choose furring channels by exposure, load, and required profile—not price alone. Galvanized steel suits many dry interior walls and ceilings, while aluminum can help where low weight or moisture resistance matters. Neither is automatically best. Check the coating specification, cut edges, and compatibility with adjacent metals; trapped moisture behind a channel can still cause trouble. The details matter.
Profiles shape performance. Hat channels create a service cavity; resilient channels can reduce sound transmission when installed as tested, without rigid screw bridges. Z channels help level uneven substrates, but their gauge and spacing must match the load and span.
NACE International’s 2016 IMPACT study estimated corrosion costs at US$2.5 trillion annually, or 3.4% of global GDP.
That figure covers many industries, not furring channels specifically, but it shows why exposure deserves attention. For coastal, humid, or chemically aggressive spaces, compare documented corrosion ratings and coating data rather than relying on a “galvanized” label alone. One missed detail: fasteners and cut ends may corrode before the channel’s broad coated face.
The lining sets the first limits. Check its thickness, weight, and approved installation direction before choosing a furring channel. A lightweight wallboard and a heavy acoustic panel may need different channel spacing and support. Confirm the channel’s span tables against the actual framing, not an assumed standard room layout. Small differences matter.
Clips must match the channel profile and the intended assembly. Some resilient clips accept only specific channel shapes, while screw placement can affect both attachment and acoustic performance. Dry-fit a clip and short channel offcut before ordering materials. It is a simple check, but easy to skip. Also verify fastener length, substrate, and required edge distances; a screw that is too long may create problems behind the lining.
Building codes and approved assembly details can vary by location and project type. Check current local requirements for fire resistance, sound control, and ceiling loads, then compare them with the lining and clip documentation. If a rated assembly is specified, changing one component may invalidate the tested design. I would recheck this point even on a familiar job; the paperwork can be less clear than the site drawing. Keep the relevant product data and installation details with the project records.
Furring channel spacing should match the board system, not a guess from a previous job. Check the board thickness, installation direction, ceiling or wall loads, and the project specification before marking out. A spacing that works for a light wall lining may not support a ceiling safely. Measure from the same reference edge each time, and mark channel centres clearly. Small errors add up.
Channel length depends on the room and the support layout. Measure each run, allowing for the actual end conditions and any required joint support. Do not leave a channel end floating unless the specified system allows it. Measure twice. Cut once. I have seen a rushed measurement waste a full length; rechecking feels slow, but usually takes less time than replacing a cut piece.
Use the fixing type and spacing stated for the substrate and channel system. Timber, concrete, and metal supports need different compatible fixings. Confirm that each fixing reaches sound material, and keep fixings aligned rather than angled or loose. In damp areas, check that the specified finish suits the exposure. Details matter. If the site conditions differ from the drawings, pause and verify the requirements before installation.
Common nominal furring-channel spacings are 16 and 24 inches on center, equivalent to 406 and 610 mm. These are planning references, not universal specifications.
Choosing lengths and fixings: Measure each run and select available channel lengths that reduce offcuts; stock lengths vary by region and system. Place joints over supports where the system requires it. Choose fixing type and spacing to suit the substrate, channel system, loads, and lining-board requirements. Always follow the relevant manufacturer’s installation details and local building requirements.
Check the supported load, channel spacing, span, fasteners, and finish weight. A ceiling carrying insulation and services needs careful assessment. Small changes matter.
Look for cracked masonry, loose plaster, moisture marks, and corroded framing. Use a straightedge to find uneven areas. Hidden backing can be weak.
Compare documented coating and corrosion-resistance data for the site conditions. Galvanized steel suits many dry interiors; aluminum may help where moisture or low weight matters. Neither is automatically best.
Hat channels create a service cavity, while Z channels can help level uneven surfaces. Resilient channels may reduce sound transmission when installed as tested. Screw bridges can undermine that benefit.
Check the lining’s thickness, weight, and approved installation direction. A heavy acoustic panel may need different spacing from lightweight wallboard. Don’t assume one layout fits every room.
Confirm that clips fit the channel profile and assembly. Check screw length, substrate, and edge distances. A short dry-fit can catch a mismatch.
A change may affect the tested design. Check current local requirements and the assembly documentation before substituting channels, clips, or linings. Paperwork can be unclear.
Record measurements and site conditions, then seek assessment from a qualified building professional. I would recheck assumed joist positions; they can be wrong.
Choosing the right Furring Channels in 2026 starts with understanding their role in creating a stable framework for ceilings or wall linings. Consider the project’s expected loads and examine the existing substrate, including its condition and ability to support the proposed system. These factors help determine the channel profile, material, and fixing approach needed for reliable installation.
Compare material options and corrosion resistance in light of the environment, then check that the channels work with the selected lining and clips. Applicable building requirements should also be reviewed before installation. Finally, plan channel spacing and lengths to suit the lining manufacturer’s guidance and the project layout, and select appropriate fixings for the substrate. Evaluating these details together helps create a practical, durable assembly while reducing compatibility issues and unnecessary adjustments during installation.